2015-06-26 12:01 14477人阅读 (6) 收藏
 分类:
分类:
java学习(46) 
目录
一、前言
上一篇文章我们将流程实例的启动与查询,任务的办理查询都进行了介绍,我们这篇文章来介绍activiti中的流程变量。
二、正文
流程变量与我们平常理解的变量是一样的,只不过是用在了我们activiti中,所以称为流程变量,流程变量在整个工作流扮演着很重要的角色。
2015-06-26 12:01 14477人阅读 (6) 收藏
 分类:
分类:
java学习(46) 
目录
一、前言
上一篇文章我们将流程实例的启动与查询,任务的办理查询都进行了介绍,我们这篇文章来介绍activiti中的流程变量。
二、正文
流程变量与我们平常理解的变量是一样的,只不过是用在了我们activiti中,所以称为流程变量,流程变量在整个工作流扮演着很重要的角色。
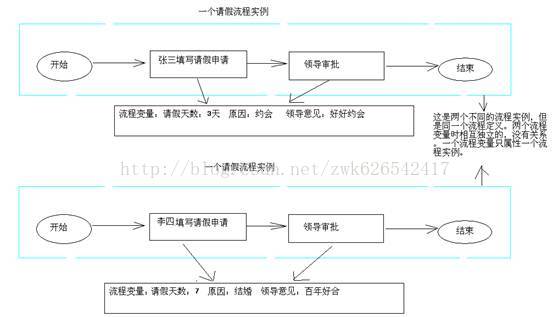
例如,请假流程中有请假天数、请假原因等一些参数都是流程变量使用的范围,流程变量的作用域范围是只对应一个流程实例。也就是说各个流程实例的流程变量是不互相影响的。流程实例结束完成以后流程变量还保存在中(存放在流程变量的历史表中)。
如图:

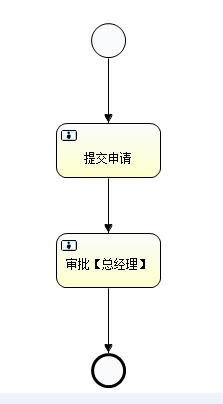
关于流程实例的例子,我们先来看下流程图的processVariables.bpmn的配置文件:
[html]
- <?xml version="1.0" encoding="UTF-8"?>
- <definitions xmlns="http://www.omg.org/spec/BPMN/20100524/MODEL" xmlns:xsi="http://www.w3.org/2001/XMLSchema-instance" xmlns:xsd="http://www.w3.org/2001/XMLSchema" xmlns:activiti="http://activiti.org/bpmn" xmlns:bpmndi="http://www.omg.org/spec/BPMN/20100524/DI" xmlns:omgdc="http://www.omg.org/spec/DD/20100524/DC" xmlns:omgdi="http://www.omg.org/spec/DD/20100524/DI" typeLanguage="http://www.w3.org/2001/XMLSchema" expressionLanguage="http://www.w3.org/1999/XPath" targetNamespace="http://www.activiti.org/test">
- <process id="processVariables" name="processVariables【流程请假】" isExecutable="true">
- <startEvent id="startevent1" name="Start"></startEvent>
- <endEvent id="endevent1" name="End"></endEvent>
- <userTask id="usertask1" name="提交申请"></userTask>
- <sequenceFlow id="flow1" sourceRef="startevent1" targetRef="usertask1"></sequenceFlow>
- <userTask id="usertask2" name="审批【总经理】" activiti:assignee="王二"></userTask>
- <sequenceFlow id="flow2" sourceRef="usertask1" targetRef="usertask2"></sequenceFlow>
- <sequenceFlow id="flow3" sourceRef="usertask2" targetRef="endevent1"></sequenceFlow>
- </process>
- <bpmndi:BPMNDiagram id="BPMNDiagram_processVariables">
- <bpmndi:BPMNPlane bpmnElement="processVariables" id="BPMNPlane_processVariables">
- <bpmndi:BPMNShape bpmnElement="startevent1" id="BPMNShape_startevent1">
- <omgdc:Bounds height="35.0" width="35.0" x="350.0" y="90.0"></omgdc:Bounds>
- </bpmndi:BPMNShape>
- <bpmndi:BPMNShape bpmnElement="endevent1" id="BPMNShape_endevent1">
- <omgdc:Bounds height="35.0" width="35.0" x="350.0" y="420.0"></omgdc:Bounds>
- </bpmndi:BPMNShape>
- <bpmndi:BPMNShape bpmnElement="usertask1" id="BPMNShape_usertask1">
- <omgdc:Bounds height="55.0" width="105.0" x="315.0" y="190.0"></omgdc:Bounds>
- </bpmndi:BPMNShape>
- <bpmndi:BPMNShape bpmnElement="usertask2" id="BPMNShape_usertask2">
- <omgdc:Bounds height="55.0" width="105.0" x="315.0" y="300.0"></omgdc:Bounds>
- </bpmndi:BPMNShape>
- <bpmndi:BPMNEdge bpmnElement="flow1" id="BPMNEdge_flow1">
- <omgdi:waypoint x="367.0" y="125.0"></omgdi:waypoint>
- <omgdi:waypoint x="367.0" y="190.0"></omgdi:waypoint>
- </bpmndi:BPMNEdge>
- <bpmndi:BPMNEdge bpmnElement="flow2" id="BPMNEdge_flow2">
- <omgdi:waypoint x="367.0" y="245.0"></omgdi:waypoint>
- <omgdi:waypoint x="367.0" y="300.0"></omgdi:waypoint>
- </bpmndi:BPMNEdge>
- <bpmndi:BPMNEdge bpmnElement="flow3" id="BPMNEdge_flow3">
- <omgdi:waypoint x="367.0" y="355.0"></omgdi:waypoint>
- <omgdi:waypoint x="367.0" y="420.0"></omgdi:waypoint>
- </bpmndi:BPMNEdge>
- </bpmndi:BPMNPlane>
- </bpmndi:BPMNDiagram>
- </definitions>

部署流程定义:
[java]
- /**
- * 部署流程定义(从inputStream)
- */
- public void deploymentProcessDefinition_inputStream() {
- ProcessEngine processEngine = ProcessEngines.getDefaultProcessEngine();
- InputStream inputStreamBpmn = this.getClass().getResourceAsStream(
- "/diagrams/processVariables.bpmn");
- InputStream inputStreamPng = this.getClass().getResourceAsStream(
- "/diagrams/processVariables.png");
- Deployment deployment = processEngine.getRepositoryService()// 与流程定义和部署对象相关的Service
- .createDeployment()// 创建一个部署对象
- .name("流程定义")// 添加部署名称
- .addInputStream("processVariables.bpmn", inputStreamBpmn)// 使用资源文件的名称(要求:与资源文件的名称要一致),和输入流完成部署
- .addInputStream("processVariables.png", inputStreamPng)// 使用资源文件的名称(要求:与资源文件的名称要一致),和输入流完成部署
- .deploy();// 完成部署
- System.out.println("部署ID:" + deployment.getId());
- System.out.println("部署名称:" + deployment.getName());
- }
部署ID:701
部署名称:流程定义
启动流程实例:
[java]
- /**
- * 启动流程实例
- */
- public void startProcessInstance() {
- // 流程定义的key
- String processDefinitionKey = "processVariables";
- ProcessInstance pi = processEngine.getRuntimeService()// 与正在执行的流程实例和执行对象相关的service
- .startProcessInstanceByKey(processDefinitionKey);// 使用流程定义的key启动流程实例,key对应processVariables文件中的id的属性值,使用key值启动,默认是按照最新版本进行启动
- System.out.println("流程实例ID:" + pi.getId());
- System.out.println("流程定义ID:" + pi.getProcessDefinitionId());
- System.out.println("流程实例ID" + pi.getProcessInstanceId());
- }
流程实例ID:801
流程定义ID:processVariables:1:704
流程实例ID801
查询任务
[java]
- /**
- * 查询任务通过流程实例id
- */
- public void findTask(){
- String processInstanceId="801";
- List<HistoricTaskInstance> list = processEngine.getHistoryService()//与历史数据(历史表)相关的service
- .createHistoricTaskInstanceQuery()//创建历史任务实例查询
- .processInstanceId(processInstanceId)
- .list();
- if(list!=null && list.size()>0){
- for(HistoricTaskInstance hti:list){
- System.out.println(hti.getId()+" "+hti.getName()+" "+hti.getProcessInstanceId()+" "+hti.getStartTime()+" "+hti.getEndTime()+" "+hti.getDurationInMillis());
- System.out.println("################################");
- }
- }
- }
804 提交申请 801 Fri Jun 26 10:55:02 CST2015 null null
################################
关于部署流程定义、启动流程实例和查询正在办理的任务我们前面的文章已经介绍过了,所以我们不再详细介绍,下面开始我们的设置流程变量,设置流程变量我们这里提供了两种方式,分别是使用基本数据类型和使用javabean的方法,同意获取流程变量也是不一样的:
使用基本数据类型:
设置流程变量
[java]
- /**
- * 设置流程变量
- */
- public void setVariables() {
- // 与任务相关的service,正在执行的service
- TaskService taskService = processEngine.getTaskService();
- // 任务ID
- String taskId = "804";
- // 1.设置流程变量,使用基本数据类型
- taskService.setVariable(taskId, "请假天数", 7);// 与任务ID邦德
- taskService.setVariable(taskId, "请假日期", new Date());
- taskService.setVariableLocal(taskId, "请假原因", "回去探亲,一起吃个饭123");
- System.out.println("设置流程变量成功!");
- }
运行结果:
设置流程变量成功!
获取流程变量
[java]
- /**
- * 获取流程变量
- */
- public void getVariables() {
- // 与任务(正在执行的service)
- TaskService taskService = processEngine.getTaskService();
- // 任务Id
- String taskId = "804";
- // 1.获取流程变量,使用基本数据类型
- Integer days = (Integer) taskService.getVariable(taskId, "请假天数");
- Date date = (Date) taskService.getVariable(taskId, "请假日期");
- String reason = (String) taskService.getVariable(taskId, "请假原因");
- System.out.println("请假天数:" + days);
- System.out.println("请假日期:" + date);
- System.out.println("请假原因:" + reason);
- }
请假天数:7
请假日期:Fri Jun 2611:07:28 CST 2015
请假原因:回去探亲,一起吃个饭123
使用javabean
JavaBean的Person类
[java]
- package com.tgb;
- import java.io.Serializable;
- import java.util.Date;
- public class Person implements Serializable {
- private static final long serialVersionUID = 361866001729020143L;
- //请假天数
- private int id;
- //请假人
- private String name;
- //请假原因
- private String note;
- //请假时间
- private Date date;
- public Date getDate() {
- return date;
- }
- public void setDate() {
- this.date = new Date();
- }
- public String getNote() {
- return note;
- }
- public void setNote(String note) {
- this.note = note;
- }
- public int getId() {
- return id;
- }
- public void setId(int id) {
- this.id = id;
- }
- public String getName() {
- return name;
- }
- public void setName(String name) {
- this.name = name;
- }
- }
设置流程变量
[java]
- /**
- * 设置流程变量
- */
- @Test
- public void setVariables() {
- // 与任务相关的service,正在执行的service
- TaskService taskService = processEngine.getTaskService();
- // 任务ID
- String taskId = "804";
- // 设置流程变量,使用javaBean方法
- /**
- * 当一个javaBean(实现序列号)放置到流程变量中,要求javabean的属性不能在发生变化 如果发生变化,再获取时,抛出异常
- *
- * 解决方案:在person对象中添加: private static final long
- * serialVersionUID="6757393795687480331L"; 同时实现序列号接口
- *
- */
- Person p = new Person();
- p.setName("翠花");
- p.setId(20);
- p.setDate();;
- p.setNote("回去探亲,一起吃个饭123");
- taskService.setVariable(taskId, "人员信息(添加固定版本)", p);
- System.out.println("设置流程变量成功!");
- }
设置流程变量成功!
获取流程变量
[java]
- /**
- * 获取流程变量
- */
- @Test
- public void getVariables() {
- // 与任务(正在执行的service)
- TaskService taskService = processEngine.getTaskService();
- // 任务Id
- String taskId = "804";
- // 2.获取流程变量,使用javaBean类型
- Person p = (Person)taskService.getVariable(taskId, "人员信息(添加固定版本)");
- System.out.println(" 请假人: "+p.getName()+" 请假天数: "+p.getId()+" 请假时间:"+ p.getDate()+ " 请假原因: "+p.getNote());
- }
请假人: 翠花 请假天数: 20 请假时间:Fri Jun 26 11:13:44 CST 2015 请假原因: 回去探亲,一起吃个饭123
查询历史流程变量
可以根据变量名称查询该变量的所有历史信息
[java]
- 可以根据变量名称查询该变量的所有历史信息
- /**
- * 查询流程变量的历史表
- */
- @Test
- public void findHistoryProcessVariables(){
- List<HistoricVariableInstance> list = processEngine.getHistoryService()
- .createHistoricVariableInstanceQuery()//创建一个历史的流程变量查询对象
- .variableName("请假原因")
- .list();
- if (list!=null &&list.size()>0) {
- for (HistoricVariableInstance hvi : list) {
- System.out.println(hvi.getId()+" "+hvi.getProcessInstanceId()+" "+hvi.getVariableName()
- +" "+hvi.getVariableTypeName()+" "+hvi.getValue());
- System.out.println("########################################");
- }
- }
- }
流程变量支持的数据类型:
流程变量支持的数据类型包括:TypeName、string、integer、short、long、double、boolean、data、binary、serializable,我们可以看出流程变量支持的包括了大部分封装类型和Date、String和实现了Serializable接口的类的类型。
三、总结
我们这篇文章将流程变量的相关知识进行了介绍,除了介绍流程变量的相关定义外还通过具体代码例子介绍了通过不同方式来设置和获取流程变量以及流程变量支持的数据类型。